Redirect Bot is a reliable bot for forwarding messages in Telegram from one channel to another. With its help, you can efficiently redirect information without the need to create message copies. It is important to note that forwarding is done through Telegram’s forwarding mechanism, ensuring the originality of messages. Even in channels protected from copying and forwarding, you can use the copying function to obtain the necessary information.
FORWARDING MESSAGES FROM GROUPS AND CHANNELS
Furthermore, the advantage of the Redirect Bot is that you do not necessarily have to join the original groups or channels to forward messages. The bot can forward messages without the need to be a member of the original and target channels. This provides convenience and confidentiality, allowing you to effectively manage the flow of information in Telegram. Thus, the Redirect bot becomes an indispensable tool for message forwarding without unnecessary obstacles.
The redirect bot allows you to forward data between various types of senders and recipients. Let’s consider the main features of each plan.
Plan “STANDARD”
- Data Forwarding:
- From open groups, channels, and forums.
- From closed groups, channels, and forums with an invitation link.
- Restrictions:
- Cannot connect Telegram bots.
- Cannot forward messages from personal chats with other users.
Plan “PRO”
- Basic Features:
- All functions available in the “STANDARD” plan.
- Additional Features:
- When connecting a Telegram account to the redirect bot:
- Forwarding messages from personal chats.
- Forwarding messages from Telegram bots.
- Forwarding data from all closed chats that your connected account is part of.
- When connecting a Telegram account to the redirect bot:
Note:
- In the “PRO” plan, additional features require connecting your Telegram account to the redirect bot.
How to Set Up Message Forwarding in Telegram
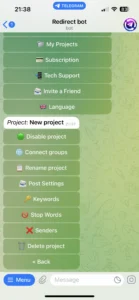
- Go to the menu
- My projects
- Add a project
- Add the sender group to the project by providing a link/invitation link or @username.
- Add the recipient group/channel to the project by selecting from the available list. If the recipient group is not available, create it in your Telegram and repeat the step.
- Enter keywords and stop words.
- Setup is complete.
This section provides a convenient space for managing your current and creating new projects in the bot. Here you can view, customize, and manage all your projects, including keyword customization, project settings, and more.
Here you can connect personal accounts to work with the Redirect bot.
It includes two subsections:
- CHAT GPT
- Direct Connection
This section is designed for more detailed configuration of message forwarding based on your Telegram accounts or using
CHAT GPT, providing the highest level of privacy and convenience.
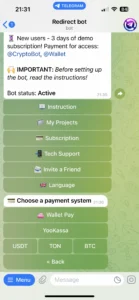
This section contains information about the current status of your subscription to the bot.
For new subscribers, there is a free demo version of the subscription for 3 days. The demo version includes all options of the “Standard” package.
After the expiration date, you can extend the subscription for the selected period: 1 month, 6 months, or 12 months. The cost of packages is indicated in the “Subscription” section.
You can pay for the subscription in rubles using MIR, Visa, Mastercard cards. Through the YooMoney payment gateway.
If you have a card in another currency, you can top up via the built-in Telegram WALLET.
Payment with cryptocurrency BTC, USDT, TON is also possible through the WALLET and CRYPTOBOT applications.
IMPORTANT: If the user does not renew the subscription, all data of their projects will be automatically deleted after 6 days. To prevent this, renew your subscription in a timely manner, or better yet, in advance.
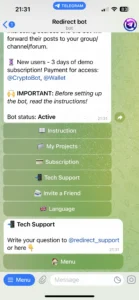
The Technical Support section is designed to provide assistance and answers to users’ questions. Our team strives to respond promptly to requests and provide high-quality support. You can ask your question by sending a message to the bot and wait for a response from our technical support. You can also write directly to the technical support service operator under the contract @redirect_support
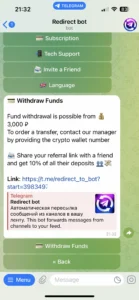
Our service allows you to earn together with friends through our affiliate program. The “Invite a Friend” button gives you the opportunity to use the referral system. In the “Invite a Friend” section -> “Instructions,” you will find your unique link for inviting friends. You can share this link with other users, and if any of them make a subscription payment, you will receive a payout equal to 10% of that person’s payment.
The best part of this system is that you will continue to receive 10% of all subsequent payments made by that person in the future. This means that the referral system not only provides you with passive income but also ongoing benefits from using this bot.

The “Language” section allows you to select your preferred interface language in the messenger: Russian or English. In the near future, we plan to add support for other languages to ensure convenience for all users of the bot.
The “🟢 Project enabled” button allows you to enable or disable the project’s operation. When pressed, the project starts working, and if the button reads “🔴 Project disabled”, it means the project is inactive and message redirection in Telegram is disabled. This feature provides a convenient way to temporarily pause the project without the need for deletion.
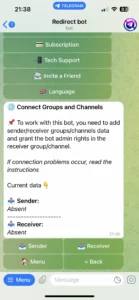
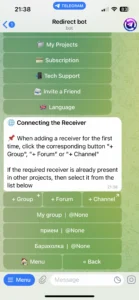
In the “Group Connection” section, you can add only one sender and one receiver. To add a sender, click on the “Sender” button and enter the ID, @username, or link to the group from which the data will be sent. After successfully adding, the information will be displayed in the corresponding field.
To connect a receiver, you must click on the receiver and select the desired receiver format (group/channel or forum). It is important to remember that you must be an administrator of the connected chat. After selecting the desired receiver, the Bot will suggest making it a group administrator – agree and click “Assign bot as administrator”. Upon successful connection, a message will appear stating that the project has been successfully connected.
Important information:
- If you are adding a forum-type receiver, after the suggestion to make the bot an administrator, you must send the bot a link to the forum’s mini-chat (or its identifier), where the messages will be forwarded.
- When reconnecting the same receiver in different projects, you need to select it from the list of already connected groups/channels.
- Connecting channels as a receiver. If the “+ Channel” button is inactive, you can select the desired channel from the “+ Group” button. If unsuccessful, try doing the same on the desktop version of the Telegram program.
Telegram old posts forwarding from chat
– By default the bot forwards only new messages.
– For each project, it is allowed to forward the chat history of the sender once. To enable this feature, go to the history forwarding section, switch the mode from “new posts” to “old posts” and select a period.
– After the forwarding completes, the bot returns to forwarding only new posts.
Limitations and caveats
– Choosing to forward a very large chat may cause data processing errors for various reasons. It is recommended to use small chats with minimal media files.
– During forwarding, errors may occur; some posts may be skipped and not sent.
– There are three forwarding modes: all posts, by keywords, by author ID. Selection depends on the task.
– When the history forwarding feature is enabled, posts are sent immediately to the recipient chat without the option to schedule them in the delayed messages section.
– When this mode is started, the bot first collects the entire history according to the selected period, then forwards from oldest to newest.
– If the sender’s chat is blocked from forwarding posts, the retelling/re-forwarding (REPOST) function will not work; only direct forwarding is available.
– If the chat is very busy with messages or has a large amount of media, Telegram can return FloodWait. In such cases, forwarding pauses and resumes automatically after the delay.
– The feature only works when connected to a stable Telegram account. A newly created or recently borrowed account may cause forwarding issues.
– It is advisable to run forwarding in reasonable limits: test on chats with a moderate amount of media to avoid errors and delays.


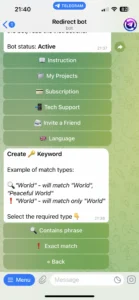
In this section, you can specify a list of keywords to filter messages. You can add up to 10 keywords. You can delete a keyword by double-clicking on it.
Important: To operate the project, it is required to enter at least one keyword.
Keyword processing occurs in the following formats:
🔍 Phrase Match: Will trigger if the message contains the keyword.
❗ Exact Match: Will trigger only with an exact match to the keyword.
Example of matching:
🔍 “World” – will trigger on “World”, “Peaceful”
❗ “World” – will trigger only on “World”
Now you can control who you receive messages from using the “🗣 Message Authors” button. Add users to the list by specifying their username, ID, first name, or first and last name, and messages will only be forwarded from these authors. This is a convenient and effective way to filter important messages!
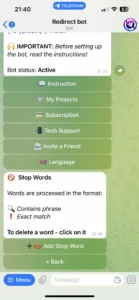
The “Stop words“ section works similarly to the “Keywords” section, but is used to exclude certain words or phrases from sending messages. You can add up to 100 stop words and also delete a stop word by simply clicking on it.
Thus, the Stopwords button allows you to exclude certain words or phrases from sending messages to create a cleaner and more relevant feed in the recipient’s group.
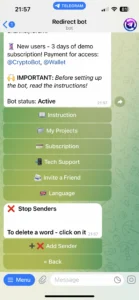
“Now you can control message senders using the “❌ Senders” button. Add message sender users to the list of blocked users by specifying their username, id, first name, or first name and second name, and you will no longer receive messages from them. This is a convenient and efficient control tool!”
Designed to remove a project from your list of projects. To delete a project, you need to press the button twice.
The first press of the “Delete Project” button serves as a warning to prevent accidental deletion of the project. When you first press the button, you will be shown a warning confirming your intention to delete the project.
If you still wish to delete the project, you need to press the “Delete Project” button again. At this point, the project will be permanently removed from your list of projects.

In this section, choose which options to turn off or leave on, thus modifying the text. When creating a project, all parameters are enabled by default.
In other words, in the forwarded message, you can customize the visual appearance of the post to include these components.
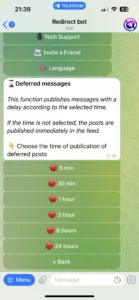
Setting Up Message Publication Delay
In this section, you can configure a delay for the publication of forwarded messages.
Option A: Standard Connection (via redirect bot):
- Messages are sent through the redirect bot.
- If a delay is enabled, messages are stored in the redirect bot’s buffer for the selected number of hours.
- After the set time has passed, the messages are automatically published in the recipient’s chat.
Option B: Connection via your Telegram account:
- Messages are forwarded directly by your Telegram account.
- If a publication delay is enabled, messages are saved in the “Scheduled Send” section of the recipient’s chat.
- You can edit these messages before they are published, which is convenient for making changes.
To disable the delay, switch all toggles to the red position.

Opens a subsection where you can enable or disable options for removing duplicate messages by text and sender. These features help maintain a cleaner feed in the recipient group by removing duplicate messages from the selected sender group.
“Remove by text” is enabled: If two messages have the same text, only the first one will be displayed in the recipient group, and the second one will be automatically deleted. This helps avoid repetitions and ensures a more orderly feed.
However, there are cases when a user slightly modifies a message and sends it again to the sender group. In such situations, the text filter will not work. Therefore, you can enable the “Remove by user” option. Then, if one user sends multiple messages within one hour, only the first message will be displayed in the recipient group, and the rest will be automatically deleted.
Thus, options for auto-deletion by text and username help maintain the cleanliness of the feed and prevent message duplication, ensuring a more convenient and organized interaction with the Redirect Bot.
This function allows replacing or deleting words or phrases from forwarded messages. You can enter values of up to 100 characters.
Example: The word “black” will be replaced with “white” or deleted depending on your settings.
It’s important to remember that the preservation and functioning of keys occur in exact correspondence.


Each project can be connected to 1 signature. Here you can specify text or a link to your group/personal profile. This information will be automatically attached to all forwarded posts.
Each project can include one button with a link. The link can lead to a website, a Telegram bot, a channel, or a user profile. When forwarding posts, existing buttons will be removed and replaced with the one added to the project.
⚠️ This feature works only when sending posts via Redirect Bot. Buttons are not added when using a personal Telegram account, as only bots can send posts with buttons in Telegram.